While there are many great step-by-step deck building guides and video tutorials already available, our deck building guide offers something that many others don’t; a solid overview of the entire process and advice on how to approach the whole process from a homeowner’s perspective, not just the list of physical steps to build a deck.
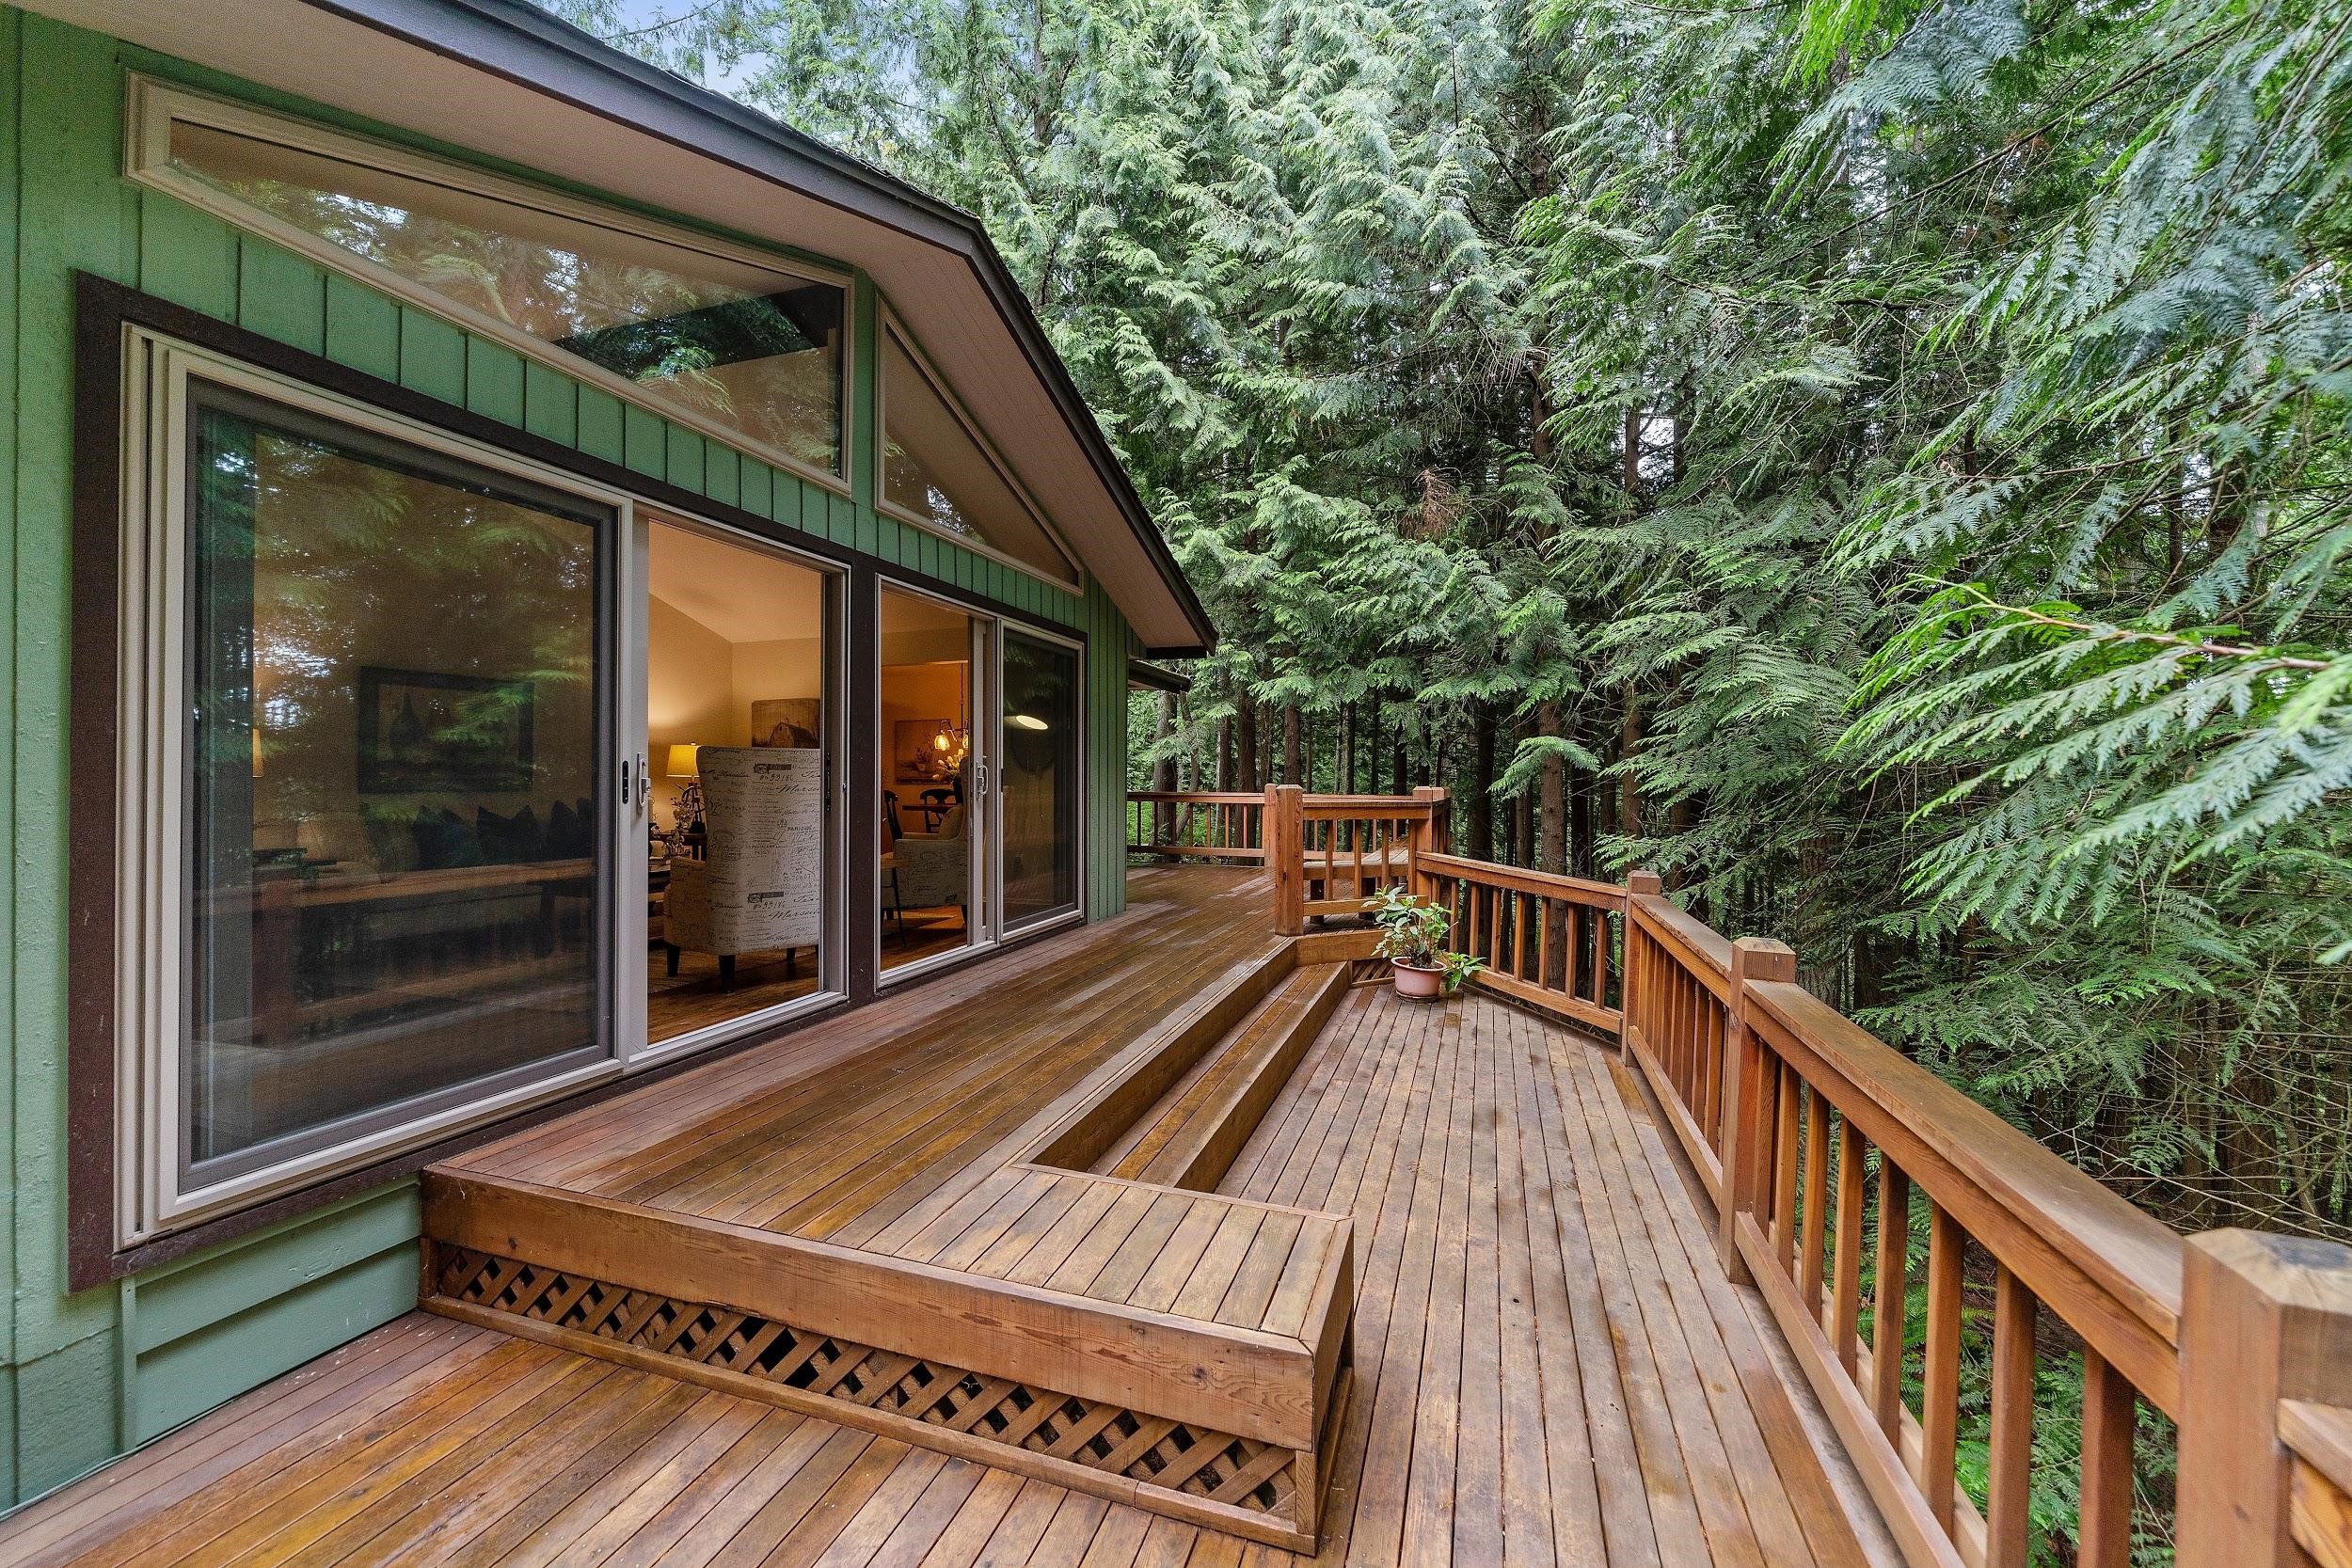
Wrap-around Porch and Deck Addition
This guide will help you plan a deck you’re going to really enjoy using. The information will assist you as you decide who to hire – a deck contractor or a handyman, or to forego pro installation and DIY. Complete deck costs for popular materials are also included.
Here’s what is included in our guide to building a deck in the backyard:
1. Planning Your Deck
2. Deck Design Tips
3. Getting a Permit
4. How to Build a Deck: An Overview
5. Potential Pitfalls & How to Avoid Them
6. Materials and Installation Costs
7. DIY vs. Deck Contractor vs Handyman Service
Time-frames for Deck Building
8. How to Save Money
Planning and Budgeting for a New Deck
The first step in deck planning is to set a budget.
It’s important to know what various deck materials cost in this step of the process. All common decking material costs are listed below. They’ll help you find the balance between deck size and the features you want and how much it will cost.
In short, what is your deck budget? Once determined, you can start thinking about materials. For example, if you do with a pressure treated pine deck, it can be larger for the same money than if you choose wood composite or aluminum.
Your budget will allow you to decide:
Your deck material. There’s a wide range of options and costs starting at about $5.00 or less per square foot for cedar and treated pine. A quality composite deck costs more than $10.00 per square foot for materials. Aluminum and some exotic woods cost even more.
Full details on deck cost by material are below.
What about deck railing? Railings add 25% to 50% to the total cost. If your deck is more than two steps off the ground, railing is required by code. To avoid railings as much as possible, build your deck to a height less than 30”. Perimeter railings won’t be required in most communities. You’ll have to install deck steps leading from the door to the deck surface. The stairs might require railing if more than two steps, but the amount of railing will be much less than if it surrounds the entire deck.
Accessorize your deck! Decorative post caps, solar powered lights, built-in features like benches and storage, and upscale railings are all available to create a custom deck plan.
Sizing your deck to its purpose. Is your deck going to be a private retreat used by just a few at a time? A small, cozy space will serve the purpose. Given your budget, you might be able to build a higher-quality deck with more accessories like a built-in bench, firepit or pergola overhead.
But if you’re planning to entertain frequently, then a larger space will be better. There should be plenty of space for deck furniture including a table and chairs. If the deck will have rails, drink railings are preferably because they are wide enough to securely place a glass or plate of food.
Is an outdoor kitchen in the works? You’ll need 50 to 200 square feet for the kitchen area based on what components will be included.
Bang for your buck: To get more square footage for your budget, a basic deck style made from treated pine might be necessary in order to achieve your deck size goal.
You get the point – unless your budget is unlimited, you’ll have to make choices about deck size, decorative caps, lighting, high-end railings and built-in deck features.
Deck Design Tips
These tips will allow you to customize deck design to suit your lifestyle, home, budget and landscape.
- Your home’s design will play a major role in deck design. The deck should encompass a door, obviously. A sliding glass door is most natural.
How wide the deck can be is determined by features of your home such as windows, garage walls extending perpendicularly away from the house and whether you’re OK with the deck extending beneath other windows of your home. Many homeowners don’t want a deck under bedroom windows, particularly a child’s bedroom, for example.
So if your home doesn’t allow the width you want to achieve the square footage you need, you’ll have to build out.
- Consider the landscape too. Are there large trees you want to get shade from? Shape the deck to take advantage of them. This is an especially good idea of the deck will be exposed to full sun will be built on the south or west side of your home.
Others don’t want an overhanging tree – too much debris dropping onto the deck.
What about the views? Consider locating the deck to take best advantage of the beauty of your yard. That’s better than a deck that’s got a great view of the neighbor’s garage wall or the broken-down van in their backyard.
Got a pool? Your options are either extending the deck to the edge of it or building a detached deck partially or fully surrounding the water.
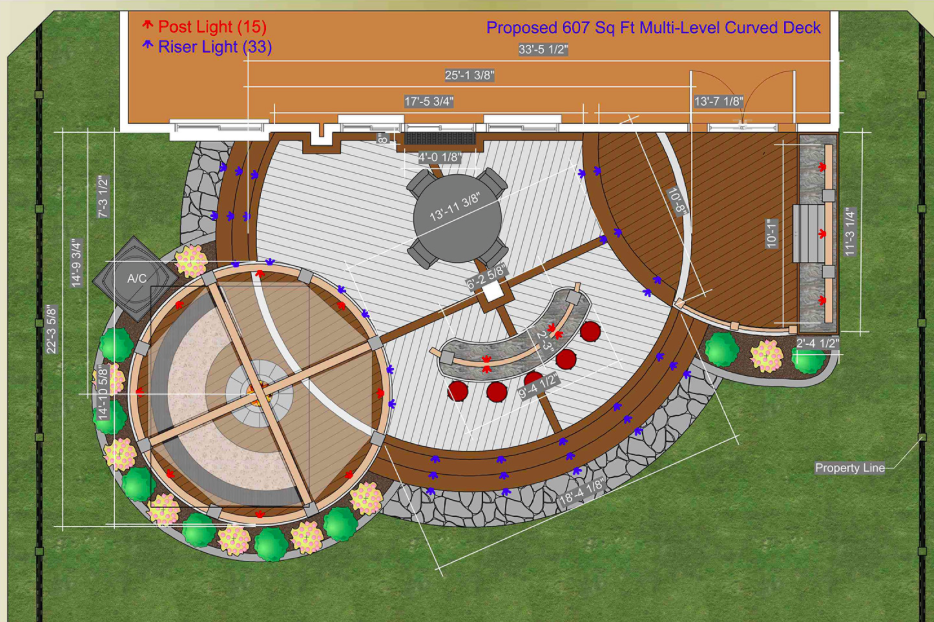
- Another word on budget. Single-tier decks cost less than multi-level decks. Square and rectangular decks are more cost-effective than other shapes due to lower installation costs. Run your planks diagonally? That will raise labor cost significantly due to taking more time and having more trimming waste.
Getting a Permit & HOA Permission
If your deck is lower than 30”, you likely will not need a permit. However, call your local Codes/Building Department to be sure.
Permits are definitely required for decks above 30”. The purpose of the permit is to have the deck inspected for safety – that it is built according to code.
Building permits can cost $25 to $300, or more based on:
- The size of the deck – The bigger it is, the longer it takes to inspect, so the costlier the permit.
- Your local cost of living.
If a building permit is required, then a site plan might also be required as part of the application documents.
A site plan is a drawing of your property. It shows property lines and dimensions, the footprint of your home and garage, the driveway, walkways and outbuildings.
It will also show where the deck will be located and its size/dimensions.
Site plan purpose: The site plan showing the deck will allow local officials to determine if the deck meets local requirements for:
- Size relative to the size of the property.
- Setbacks – how far off the property line a permanent structure must be.
What about the homeowner’s association, the HOA?
If you’re in an HOA, check its bylaws for decks. It might have something to say about deck size, deck height, deck style, deck location and even the materials you use for a deck.
If your proposed deck meets HOA requirements, submit your site plan as part of the documents. It will satisfy the HOA board.
How to Build a Deck: An Overview
Your options are:
- A deck adjoining / attached to your home. This is most common and allows easy access in and out. It becomes an extension of the house, so to speak. An awning can be attached to the house to provide welcome shade on hot, sunny days or an escape from rain.
- A free-standing deck elsewhere in the yard. This deck type is often used around a pool, too. A taller deck works well around an above-ground pool.
- A low deck that can be placed anywhere and does not require a permit. Put it next to the house for access, but stairs and a railing might be required, or build it next to an in-ground pool.
Steps to Building a Deck
Here is an overview from start to finish. The first set of steps are preliminary. Those that follow are a step-by-step deck building guide.
Step 1. Call 811 to have someone from the local utility company mark underground utilities to keep you from hitting them when digging post holes.
Step 2. Finalize the design.
If you want to design the deck, get graph paper and consider one square to be one foot.
Sketch your deck ideas. Try several designs with input from those that will use the deck. Consider whether each is:
- A good size for your purposes
- Will give you the views you want
- Takes advantage of natural features like trees for shade and bushes for privacy
Step 3. Decide DIY or Contractor?
We’ll talk money later. Some homeowners definitely plan to hire a pro for the project; others will definitely DIY it.
The DIY enthusiast should take the sketch to the building materials store. Many have deck design services. Even if they don’t, they want to sell you the material. Someone at the pro desk or help desk will be willing to assist you in finalizing the design and putting together a materials list.
If you are planning to hire someone, invite several deck builders to your home. They will view your plan, make suggestions about design that will improve it according to your purposes and ultimately give you a cost quote for the material or various materials you’re considering.
Once you talk about costs with the home improvement store or deck contractors/handyman services, you can finalize design, material and deck size to fit your needs and budget.
Step 4. Purchase and gather the materials, supplies like deck screws, and all the tools you’ll need.
Now it’s time to focus on building your deck.
Step 1. Outline your deck. Build and set batter boards, and use string to outline your deck. You’ll need one for each deck corner.
Batter boards are built with wood stakes for legs and a 2-foot furring strip screwed to the top of each. Place the boards at the deck corners, and attach string to them to form your deck’s outline.
The string should also be set at the exact height the deck will be. Use a square and level to ensure the corners are square and the deck will be level.
A line should be snapped or marked on the house where the deck will meet it.
Step 2. Mark for posts. Follow code guidelines for post spacing and location, and mark post locations.
Pro Tip: Installing landscape fabric or other barrier on the ground beneath where the deck will be will help with future weed control. A layer of gravel over the barrier, once the deck is framed, will improve performance of the barrier.
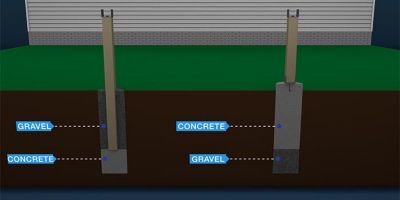
Step 3. Set the posts. The sub-steps start with digging holes to the depth code requires. They’re deeper where frost is potential. Most code requires them to be 6” below the local frost line, which is anywhere from 12” to 36” depending on your climate. This prevents frost from causing the deck posts to upheave and damage your deck.
In dry soils, you might be able to pour a small concrete footer, and sink a pressure-treated post into the ground with gravel added as fill.
In wet soil, a deeper concrete footing is required. The post then sits above ground on the footing. Cost is a little higher, but eventually moisture will rot even pressure treated posts.
In ground posts for a deck frame
Pro Tip: A concrete footer tube or form helps you get a perfect footer without wasting concrete. Cut the tube to be a few inches above grade. Place it in the post hole and use your level to ensure it is plumb. Pour the concrete.
Step 4. Set a threaded anchor bolt in the wet concrete if your posts will be completely above ground. Put it head down with about ¾” sticking out of the concrete.
When the concrete cures, attach a deck post bracket to each bolt, and fasten the deck posts to the brackets.

A deck frame post bracket
Step 5. Add beam support brackets to the top of the posts. These brackets secure the deck beams upright.
Step 6. Build and attach beams. The beams are made from two 2”x10” boards. Once screwed together, place the two-board beams in the brackets. Secure them with deck screws.
Pro Tip: If the deck is larger than 100 square feet, cut bracing boards and attach them at an angle to the beams. These will keep the deck posts from shifting while the decking is added.
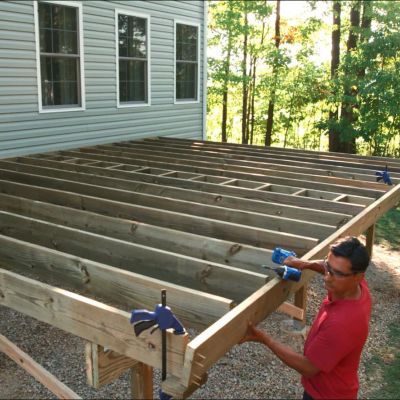
Step 7. Build the deck floor frame using 2”x10” boards. The first is attached 8” from the house. The others are attached every 16” on center, which means their centers, not edges, are 16” apart.
Step 8. Attach side rim joists together with deck screws and a bracket, and fasten them to the beam tops.
Step 9. Add the rest of the floor joists every 16” on center using a joist bracket. Then attach the final rim joist to complete the framing of the deck.
A deck frame rim joist
Step 10. Install the main railing posts if the deck will have railings. Posts are installed at corners next to the house, at all other corners and every 4-6 feet in between. They are attached to the outside of the rim joist using brackets, fasteners and large carriage bolts through pre-drilled holes.
Step 11. Install the deck boards to the framing beneath. Start at the house, and work away.
Pro Tips: Pre-drill holes to prevent deck boards from splitting, and use quality deck screws.
There are more pro tips for installing deck boards in this guide from Lowe’s.
Step 12. Finish the railings. If you’re using panels, attach them to the posts. If the railings are stick built, attach the top and bottom rails. Then drill top and bottom pilot holes in each baluster, and use wood screws to attach them to the rails. Balusters should have a gap between them of 3.5” or less.
Potential Pitfalls & How to Avoid Them
There are potential pitfalls in every step of the process!
Failure to plan – That’s planning to fail, right? Think through your budget carefully. If it isn’t unlimited, you’ll have to make decisions about design and size vs materials. How much does a deck cost? See the next section for deck costs for every common material with and without railings.
And design a deck with your intended uses in mind. If you envision a table and chairs, but don’t plan the space, it might not be possible or be quite cramped.
Keep deck furniture in mind too. It isn’t cheap. If your whole budget goes to the deck, then it might be folding chairs, plastic outdoor chairs or camp chairs until the budget is restocked.
Failing to get a permit – If a permit is required but you don’t get one, problems minor to major could ensue. On the minor end, the assessor might see the deck and report it. The result might be a fine.
If the deck was built to code and with appropriate setbacks, the issue might be resolved.
If not, and it will probably get inspected once discovered, you might have to re-do the deck or move it. Both are major hassles that cost more than the original build.
The worst case occurs if the deck is unsafe and someone gets injured.
So, get the permit. And remember to include a site plan in the application. Having it ready will prevent a delay in obtaining the permit.
Ignoring HOA guidelines – This could also lead to a fine or the requirement to modify, move or remove the deck. HOA’s can be very strict – and then quite nasty to those that run afoul of their guidelines.
Choosing the wrong material – Know thyself! If you don’t like deck maintenance, the choose plastic composite, PVC or aluminum over wood. It will cost more upfront, but you won’t have to maintain it or pay someone to maintain it. Lifetime costs, by the way, of non-wood decks are similar to wood decks due to lower maintenance costs and greater longevity.
Materials and Installation Costs
This chart shows you the cost for common deck types. All costs are per square foot except railings, which are cost per Linear foot.
| Treated Pine | Cedar | Composite | PVC | Aluminum | Ipe | |
| Pine Substructure | $2 – $4 | $2 – $4 | $2 – $4 | $2 – $4 | $2 – $4 | $2 – $4 |
| Deck Materials | $4 – $6 | $5 – $8 | $6 – $14 | $5 – $10 | $9 – $15 | $10 – $18 |
| Railing Materials | $6 – $10 | $8 – $14 | $28 – $65 | $22 – $50 | $24 – $55 | $27 – $40 |
| DIY Installation | $7 – 12 | $9 – $14 | $12 – $26 | $10 – $22 | $14 – $23 | $18 – $25 |
| Pro Installation | $12 – $20 | $14 – $22 | $20 – $44 | $16 – $30 | $22 – $38 | $27 – $37 |
Some manufacturer websites like composite brands TimberTech and Trex have cost calculators on their site. They are very useful in determining materials costs.
Cost factors are:
- Decking material. As you can see, composite has the widest range of costs because material quality varies greatly.
- Whether railings are included. Railing cost varies a lot too due to your many railing options from plain to complex.
- Complexity of the deck – rectangles take less time than L-shaped, curved, two-level decks and other shapes.
DIY vs Deck Contractor vs Handyman Service
Here are the pros, cons and costs of each option.
DIY – If you’re handy and have experienced, then a deck is something you should consider building. The process is straightforward. Just stick to code and best building practices. Watch the suite of videos from Lowe’s or at least read the deck building pages on its site.
Your cost will include the material costs listed in the table above plus accessories like fasteners, bags of concrete and any tools you don’t have. Of course, acquiring tools means you’ll have what it takes for future DIY projects, so they’re often more of an investment.
Handyman Service – Many handymen and services do a great job building decks. Just make sure they’re experienced. Ask to see pictures of their deck jobs. Get a few references from deck customers and check their online reviews at Google, Angie’s List and the Better Business Bureau.
Potential savings using a handyman or handyman service are 0% to 15%. Generally speaking, the larger the company, the higher the cost because they’ve got more overhead expense.
Deck Contractor – A carpentry company that offers decks as one of their specialties will probably give you the best deck. But at the higher cost too. Again, check references and reviews to make sure you find a qualified installer for your deck.
How to Save Money
There are four ways to cut costs for a new deck.
Site Plan – Also called a plot plan, you will save up to 90% when you purchase your site plan from an online company that specializes in them.
24H Plans delivers professional site plans that get submitted to building departments and HOAs every day. Our CGI artists and draftsmen use the latest software to produce professional site plans of the highest quality. Or you can hire an architect or engineer to produce a decent site plan for a “multiple times higher” overall cost.
Remove the Old Deck – If you are replacing a deck, you’ll save a few bucks per square foot to tear it down.
Have it Built Off-season – Everyone wants a deck in the spring or summer. If you get deck cost estimates in the fall or, climate permitting, winter, you’ll probably save money.
Get Multiple Estimates – Make sure everyone knows they’re competing for the work. Hungry contractors will “sharpen their pencils,” that is, give you their best price.
Time-frame for Deck Building
An experienced team of 2 builds at a rate of 12-20 square feet per hour. Complexity of the deck is a huge factor. A single-level rectangle will be on the short end of the range. Complex and split-level decks with stairs come in on the high side of the time-frame estimate.
150 square foot deck: 1 to 2 days
250 square foot deck: 2 to 3 Days
400 square foot deck: 3 to 5 Days
Depending on your skill level and whether you have help, add a day or two to these times if you are doing it yourself.
Note: Here’s how we can help: 24hplans has a team of highly-trained, professional architects and drafters who can prepare any kind of site plan in the shortest amount of time possible, so that you can easily obtain that building permit and get on with your project. Use the promotion code: 24hplans-20off to get a 20% discount off any package. — Please note this is a limited time offer, exclusive to the readers of our blog. This offer is not being advertised anywhere else.

Leave A Comment